
- Throne of Thunder
- Manaforge Omega
- MSV / HoF / ToES
- Liberation of Undermine
- Dragon Soul
- Nerub-ar Palace
- TotFW / BWD / BoT
- Amirdrassil
- Aberrus
- Ciudadela de la Corona de Hielo
- Ruby Sanctum
- Trial of the Crusader
- Rotmire
- Imperator Averzian
- Vorasius
- Vaelgor & Ezzorak
- Fallen-King Salhadaar
- Lightblinded Vanguard
- Crown of the Cosmos
- Chimaerus the Undreamt God
- Belo'ren, Child of Al'ar
- Midnight Falls
- Immerseus
- Fallen Protectors
- Norushen
- Sha of Pride
- Galakras
- Iron Juggernaut
- Kor'kron Dark Shaman
- General Nazgrim
- Malkorok
- Spoils of Pandaria
- Thok the Bloodthirsty
- Siegecrafter Blackfuse
- Paragons of the Klaxxi
- Garrosh Hellscream
- Jin'rokh the Breaker
- Horridon
- Council of Elders
- Tortos
- Megaera
- Ji-Kun
- Durumu the Forgotten
- Primordius
- Dark Animus
- Iron Qon
- Twin Empyreans
- Lei Shen
- Ra-den
- Plexus Sentinel
- Loom'ithar
- Soulbinder Naazindhri
- Forgeweaver Araz
- The Soul Hunters
- Fractillus
- Nexus-King Salhadaar
- Dimensius, the All-Devouring
- The Stone Guard
- Feng the Accursed
- Gara'jal the Spiritbinder
- The Spirit Kings
- Elegon
- Will of the Emperor
- Imperial Vizier Zor'lok
- Blade Lord Ta'yak
- Garalon
- Wind Lord Mel'jarak
- Amber-Shaper Un'sok
- Grand Empress Shek'zeer
- Protectors of the Endless
- Tsulong
- Lei Shi
- Sha of Fear
- Vexie and the Geargrinders
- Cauldron of Carnage
- Rik Reverb
- Stix Bunkjunker
- Sprocketmonger Lockenstock
- One-Armed Bandit
- Mug'Zee, Heads of Security
- Chrome King Gallywix
- Morchok
- Warlord Zon'ozz
- Yor'sahj the Unsleeping
- Hagara the Stormbinder
- Ultraxion
- Majordomo Staghelm
- Spine of Deathwing
- Madness of Deathwing
- Ulgrax the Devourer
- Bloodbound Horror
- Sikran, Captain of the Sureki
- Rashanan
- Broodtwister Ovinax
- Nexus Princess Kyveza
- Silken Court
- Queen Ansurek
- Conclave of Wind
- Al'akir
- Omnotron Defense System
- Magmaw
- Atramedes
- Chimaeron
- Maloriak
- Nefarian
- Halfus Wyrmbreaker
- Valiona & Theralion
- Ascendant Council
- Cho#gall
- Sinestra
- Kazzara
- The Amalgamation Chamber
- The Forgotten Experiments
- Assault of the Zaqali
- Rashok, the Elder
- Zskarn
- Magmorax
- Echo of Neltharion
- Scalecommander Sarkareth
- Lord Marrowgar
- Lady Deathwhisper
- Gunship Battle
- Deathbringer Saurfang
- Festergut
- Rotface
- Professor Putricide
- Blood Prince Council
- Blood-Queen Lana'thel
- Valithria Dreamwalker
- Sindragosa
- The Lich King
- Halion
- Northrend Beasts
- Lord Jaraxxus
- Faction Champions
- Twin Val'kyr
- Anub'Arak
VS / DR / MQD
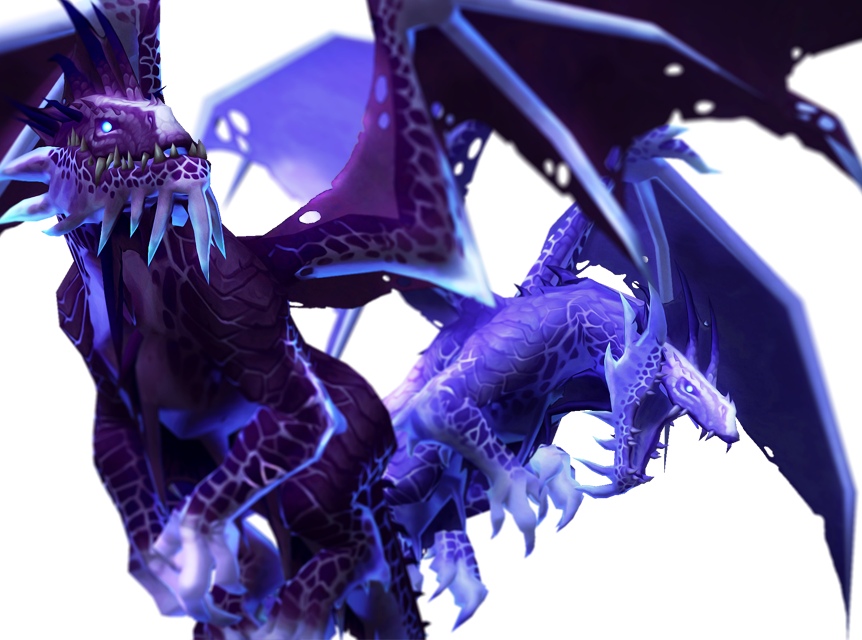
Vaelgor & Ezzorak
Guía Estratégica
Single phase encounter with an intermission.
Two boss encounter. Both dragons can be attacked during the phase. Neither can be attacked during the intermission.
Break tethers when you are tethered.
Soak the Gloom orb as it travels across the room to reduce its area of denial and damage.
Lock down the Voidorbs with crowd control.
Stay safe inside the barrier during the intermission.
Gracias a Sebte por las traducciones a español.
Tank the dragons apart and keep their health between 10% of each others to avoid the damaging buff.
Tank should use the beam aimed at them (not at a random marked player) to reduce the tether effect.
Interrupt and CC the adds, soak the Gloom orb.
Everyone
Run away to break your tether

Tethers all players to Vaelgor and pulls them toward him (the pull is strong!). Tethered players take increasing damage over time.
Each time a player breaks their tether, the raid takes some damage.
Everyone
Dip into the beam to reduce Nullzone pull.

Large cone-shaped beam toward the tank that lasts 4s. Standing in beam deals damage and applies stacks of a debuff. Each stack weakens strength of the Nullzone pull.
If your class is slow, you can dip quickly into this beam to get out of Nullzone tethers more easily.
Everyone
Avoid being hit and dispel feared players.

Cone-shaped blast toward a random marked player. The cone deals damage and fears any player hit.
Feared players will run away uncontrollably. The fear can be dispelled.
Everyone
Touch the orb to soak it as it passes.

Ezzorak creates a Gloom orb and shoots it toward the tank. The orb shrinks each time a player soaks it, up to 3 times.
When the orb reaches the edge of the room, it will explode, deal raid-wide damage, and leave a massive puddle. Puddle size and explosion damage are reduced with each soak.
If a gloom reaches the edge of an existing puddle, it will also explode, so make sure to aim correctly!
Players who soak Gloom orb take damage and a heavy, stackable DoT for 12s.
Everyone
Spread out and CC the Voidorbs

Every player is marked with a small AoE circle. After a few seconds, the circles pop for damage and spawn Voidorbs.
Voidorbs will cast voidbolt on targets, dealing some damage. You can crowd control and interrupt them. Try to knock and grip them together and kill them ASAP.

The dragons get a 100% damage buff if their health differs by over 10%, or if they are tanked less than 15yd apart.
If one dragon dies before the other, the living dragon will get a stacking 30% damage buff.

Massive physical damage and some shadow damage on the tank. Ezzorak's melees are empowered and apply a healing absorb to the target until Rakfang hits a new target.

Several random players are randomly debuffed with a DoT. This stacks and occurs constantly throughout the phase.

Physical and shadow damage and a knockback on the tank. Increases Vaelgor's melee damage, stacking until Vaelwing hits a new target.

Players caught behind Vaelgor or Ezzorak are hit by their tail, getting knocked away and taking a short bleed DoT.

At 100 energy, the dragons fly away out of range and deal raid-wide damage for 25s.
This starts the intermission.
The dragons get a 100% damage buff if their health differs by over 10%, or if they are tanked less than 15yd apart.
If one dragon dies before the other, the living dragon will get a stacking 30% damage buff.
Physical and shadow damage and a knockback on the tank. Increases Vaelgor's melee damage, stacking until Vaelwing hits a new target.
Massive physical damage and some shadow damage on the tank. Ezzorak's melees are empowered and apply a healing absorb to the target until Rakfang hits a new target.
Players caught behind Vaelgor or Ezzorak are hit by their tail, getting knocked away and taking a short bleed DoT.
Several random players are randomly debuffed with a DoT. This stacks and occurs constantly throughout the phase.
At 100 energy, the dragons fly away out of range and deal raid-wide damage for 25s.
This starts the intermission.
Stay close to the center of the barrier
Move to the edge if debuffed
Kill the add quickly before the dragon comes down again
Everyone
Stand in the barrier
Kill the add
Move out if debuffed

A large barrier spawns. Stand inside to take reduced damage from Midnight Flames during this phase.
When the barrier forms, a Manifestation of Midnight will spawn, and Midnight Manifestation DoTs will be removed from players.
Several players are marked with a circle. They pulse damage around them and explode after 4s.

Every 30s, the add gets buffed, gaining 75% attack speed and 50% resistance to slows.
Every 30s, the add gets buffed, gaining 75% attack speed and 50% resistance to slows.
